


Using the Python Write to File Function
Table of Contents
How can developers and clients benefit from data being in a file format when there are so many other options out there? Why not just use a simple HTML page with AJAX requests and tables to display the data? In this blog post, let me show you why using Python to construct files is productive way of of creating and filling them with data.
We will go over a few APIs to populate our files with data, and learn how to use the Requests HTTP library to fetch data. In this post, we’ll be using Python 3 and its toolkit.
You can easily access the code from this article in Kite’ github repository.
Let’s get started!
Setting objectives
Our first step is to set some objectives for our files.
- First, we want some inspiration: to do that, we’re going to form a request to a famous quotes API using the Requests module in Python.
- Second, we want to make sure our investments in the stock market are looking solid. We’ll use IEXFinance Python wrapper around the Investors Exchange Developer API.
- Third, we also want to make sure our cryptocurrencies are staying green as well. We’ll fetch data with the Requests module from the Coinbase API to check on our digital assets.
- Last, we’ll take all this fetched data and write to files that correspond to each time we run the script and have one accumulative file. All of our files will be in CSV format.
I’m assuming that we’ll utilize the functionality of spreadsheet software to graph the data stored in the files. Let’s dive into how the Requests HTTP library works, and get our quotes!
Using the Requests module
 The Requests HTTP Library is an elegant way of making HTTP requests without relying on manual labor of forming query-strings or to form-encode POST data.
Our primary focus will be making a GET request to TheySaidSo or FavQs API to fetch our inspirational quote. To start, we need to install the Requests library in our project’s directory. In a Unix terminal, you can simply run pipenv install requests if you have pipenv installed.
If you don’t have pipenv installed, use pip install pipenv to install it:
Getting inspiration by fetching quotes
Now that you have the Requests library available to use, let’s form our first request. Since we’ll be tracking our favorite stocks and crypto coins, it may be a good idea to add hope to our file. We’ll then form an API Get request to theysaidso.com‘s quotes API.
The ‘quote of the day’ endpoint is straightforward to digest and will give us some inspiration when we need it most. Alternatively, you can also use the FavQs API. This quote API will allow for more requests if you plan to use the script more than 10 times per hour. Now it’s time to form that request and format the response!
Above, you’ll notice how we form the request and format the response. I provided an example for both APIs.
I’ll be referencing FavQs’s API since I’m not paying for TheySaidSo’s API. This way, I can always have a quote each time I run the script since I won’t hit their rate limit of 30 requests per 20 seconds.
First, we make the request, and when it succeeds, we receive a response which needs JSON decoding. After decoding the response, we are able to simply combine the dictionary key/value pairs into a formatted string. This string will be (‘quote’ – ‘author’).
Remember that we might come across commas in the quote we’re searching for. To account for this, we need to use the replace() function to replace all commas with an HTML hex code value for commas, or any chosen value that’s still easily replaceable. Replacing it with the hex code value will ensure that future replacement is just as straightforward. Now we can store this string as a constant to use later when we write it to our file.
For our next example, we’re going to be looking at some different data: let’s fetch our favorite stock prices!
Lassoing the data-driven bull
There are a plethora of Python modules to assist you in receiving stock information. I chose the IEXFinance module, which wraps around the Investors Exchange Developer API. You’ll need to have the module accessible in the script file. To install with pip:
The iexfinance module provides a plethora of valuable features, including real-time quotes, historical data, trading analyses, etc. For our reference, we are only concerned with getting the stock price at the time we run the script.
Analyzing the code above, we use the Stock() function to call a single ticker. We do this three times to keep the code simple, but you can also use a list inside of Stock() to fetch various ticker information.
Our top priority is to get the price of our favorite stocks: Tesla, Apple, and Google (Alphabet). Using the constants, we can call get_price() on them. The get_price() function returns a float which we need to convert into a string. I decided to use the str() function for conversion to maintain readability.
Now that we have our stock prices stored and a quote ready, it’s time to get our crypto coin prices!
Catching coins with virtual flips
Coinbase is one of the most famous exchanges operating today. Since Coinbase is so popular, they’ve been able to provide their developer community with a superb API. They’re also generous enough to allow 10,000 API calls per hour! In this example, I’ll be checking the buy price of BTC, ETH, and LTC to USD.
Looking at the provided example, we need to form three requests to the Coinbase API– one for each currency. We get the response object on success, decode the JSON, and then set that amount to a constant per coin.
Now that we have our quote, stock prices, and crypto prices, there are only a few more steps left to format the data correctly. To get our data formatted correctly for the files we’ll be creating and updating, we first need to think about how we’ll name our generated files and structure the organization.
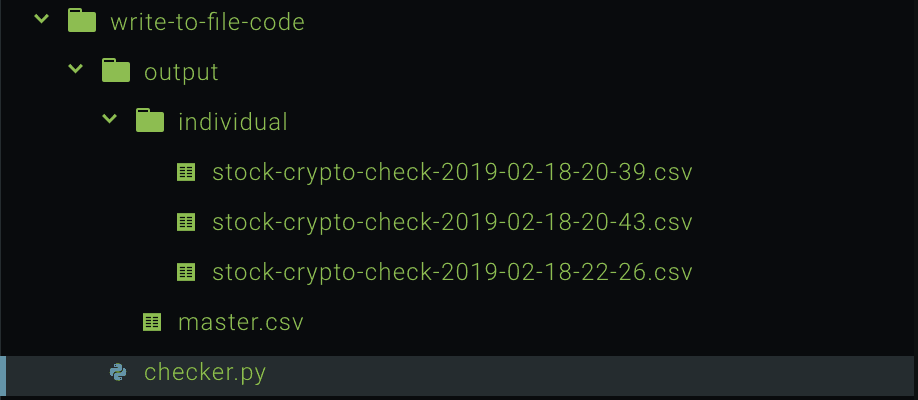
In my example, I use an output directory with the main file named master.csv and the sub-directory named ‘individual.’ Within the ‘individual’ directory, I place the file we generate each time we run the script. Our next question: what should the name be?
All in good time
How about we use the DateTime module! I chose 'stock-crypto-check-YYYY-MM-DD-HH-MM' because we’ll generate a new file name each minute we run the script.
I’m not concerned about running this down to seconds, so delimiting by minutes works for me. If you plan to run it once a day or once an hour, just change the formatting to remove the time format depending on your desired interval.
In the example above you’ll see that I created two other time formats as well, which will be in their corresponding files. I’m using the DateTime module by calling for today’s date and time. I format the date constant by using the strftime() function which formats the date string using format codes.
Let’s now revisit the data we received from our requests and module functions to get it ready for the files.
Formatted strings attached
Since we are writing and appending to CSV files, we need to start with a comma delimited header line. I think going by ticker and price to start makes sense, but I also want to include our date and quote on the last line we write. Those fields will be the last two in the header and only filled on the last line of the output.
When writing to a file, we need to be sure to create new lines. According to the Python documentation, we can use \n on a Unix machine (\r\n for Windows).
Our stock and crypto strings should follow the way we set up our header. Since we have three stocks and coins, I’ll have six tickers, prices, and new lines, but I’ll also have twelve empty cells in total. Each stock and cryptocurrency group will need a new line to ensure we follow the format correctly.
Now that we have our stock and cryptocurrency strings formatted, we can move onto the satisfying part. Let’s write all of this data to our files!
Poetry in motion
The most crucial part is ensuring we have our directories made for the master and individual files. Otherwise, we’ll get a ‘FileNotFoundError’ if the directory is not found.
First, let’s create the master.csv file. The first argument is the name of the file and the second argument is the mode.
Using the open function with ‘a’ as the mode signifies we’ll be appending to the file named. The appending mode will create the file if it doesn’t exist, and if it does – it will write after the last line.
I only want to add the header once, so I opted for the OS module to check the size of the file in bytes. If the file is brand new the size will be 0: thus, we can add the header. Since this only happens once, you may opt to create the master.csv and add the header manually before running the script.
Finally, the best part: we write our formatted data to the file.
Since we’re writing three lines (excluding the header), we need three write functions. We’ll use the last write function to format our date and quote. To follow the header fields, we need two empty columns to start. Then we can concatenate the master date and quote followed by a newline since we are appending to the master.csv file. We must close the file (using the close() function) once we are done to ensure we free up system resources the file was using.
For the individual files, we will follow the same pattern with a few minor changes.
First, we will use the formatted file date within the name parameter of the open function and use the ‘w’ mode for writing.
If you run the script within the same minute, then the previous file will be overwritten with the latest data received. You can prevent this from happening by adding seconds to the file name.
Unlike the master file, we’ll want to add the header each time. We will run the write function four times in total for our individual files. The only other difference is not needing the newline after the date and quote data.
Conclusion
Shazam! We now have a working script we can use to generate output data for historical purposes with other projects.
There’s plenty of room to improve the code shown: for example, using the Python 3.x convention, refactoring the Stock() function, using the context manager for opening files, pandas to read/write excel files, and many more.
This tutorial gives you a starting point with a clear understanding of the capabilities to create a script to dynamically generate files and update existing ones. I hope you’ve gained insight about using data to write to files and generate dynamic files programmatically. Happy coding!
This post is a part of Kite’s new series on Python. You can check out the code from this and other posts on our GitHub repository.
Resources
 in San Francisco